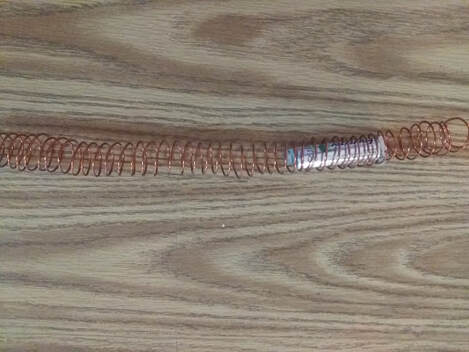
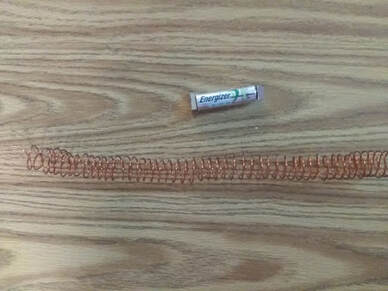
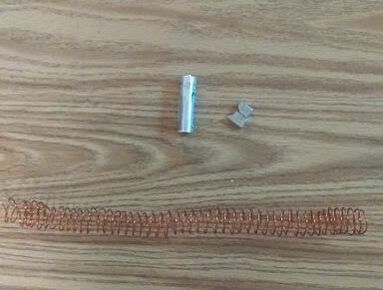
Electromagnetic Device- Electromagnetic train
|
|
Rube Goldberg Cartoon
During this project we needed to create a Rube Goldberg Machine, Which is a overly complicated machine that completes a simple task such as popping a balloon or setting off domino's. We needed to connect our RGM to a satirical piece of work we had for humanities. For my project I made a cartoon of my machine completing the simple task of rolling a ball on a computer to wake it up. To connect it to my satirical piece the ball was shaped like the COVID-19 virus and when the computer woke up it was on a joined zoom class, implying COVID-19 making schools work though online systems like zoom.
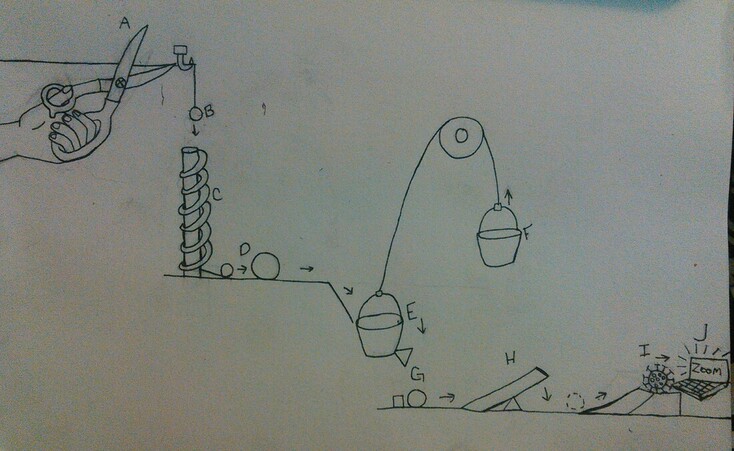
Energy: Conservation energy is the thought that energy can not be created or destroyed at any time, but that energy transfers from one form to another or one object to another. Through my Rube the energy, like explained in the definition of conservation energy, transfers the energy with each step. Starting at the start of my RGM the ball being held by the string holds potential energy. Right as the string is cut and the ball falls into the 720 spiral and as this happens the ball has kinetic energy. Once ball A reaches the bottom of the spiral it hits the second ball (ball B) transferring the energy over giving ball B kinetic energy. As ball B rolls into the bucket of the pulley system it gives the system potential gravitational energy, and as the bucket moves down gaining speed it turns into kinetic energy. Once the bucket and wedge hit between the block and ball C, ball C gains kinetic energy as it moves to the lever, giving the lever potential gravitational energy, as it moves turning into kinetic energy.
Mechanics: There are six simple machines, they are the inclined plane, wedge, lever, wheel and axle, screw, and pulley. They are the steps of your Rube when all put together create the overly complicated machine. Looking at my RGM cartoon you can see each of the 6 simple machines, starting with the challenge step that also counts as my (1)screw, as the ball rolls down it activates the (2) pulley system which is hooked up to the (3) wheel and axle. As the pulley is pushed down it makes the (4) wedge push the next ball to the (5) lever as it moves over the lever it rolls up the (6) inclined plane pushing the COVID-19 virus ball onto the computer waking it up. For the challenge step I chose the 720 spiral, with the spiral “floor” being turned at an angle you can get something like a ball to roll down without having a railing or wall on the edge. With two spins of 360 degrees (the 720 mark) the object has officially made it back to the same position on a lower level as when started. I chose this challenge step because it was the most visually appealing to me and I was unsure of another way to incorporate the simple machine of a screw into my RGM.
Learning and Growth: My number one takeaway/ thing I learned during this project was all the different parts to a Rube Goldberg machine, though I had seen many before I never knew about the specifics of each step and just how difficult it can be for your design to succeed. Though I made a cartoon instead of making the machine in person I heard of many struggles and attempts from close friends and just what it took to make every simple machine work in harmony. The reason I had to do a cartoon over making the actual machine itself was due to my struggles this year with being majorly online and mental health decline. I had fallen behind and in order to get through this project I talked with the teachers about what the best next steps would be. After having talks with them online after classes ended we worked out what would be the best plan for my academic success and we decided I would make a cartoon similarly to how Rube Goldberg himself would show and make his designs. It took a lot to talk about what I was going through and why I was behind and I feel like my biggest strength through this project was my communication with teachers. Making plans and talking about what we believed would be the best next steps to take to plan for my success.
Homemade battery
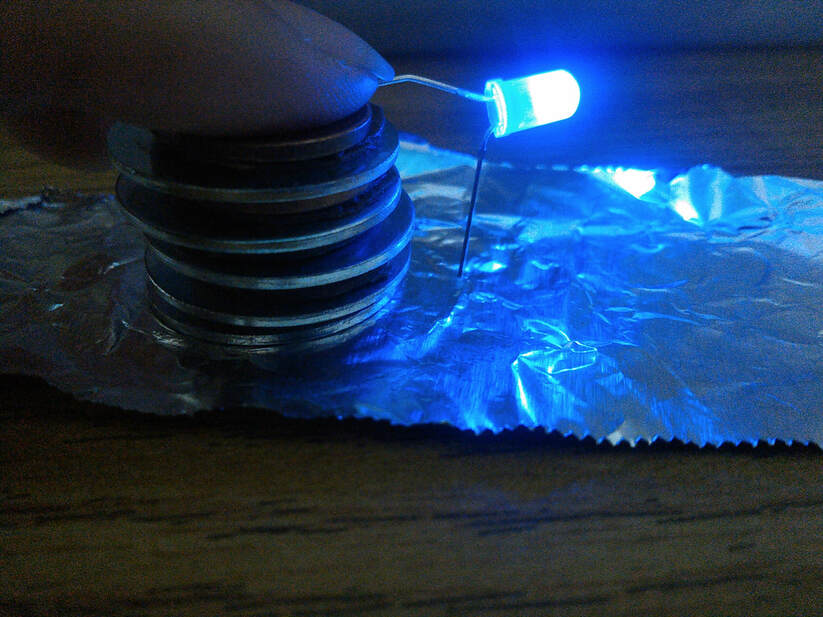
I decided to make a penny battery and in order to make the battery I made you need to have five pennies, five zinc washers and five pieces of circular cardboard soaked in vinegar. The zinc washers act as the anode, the copper penny acts as the cathode and the cardboard soaked in vinegar is the electrolyte. Placing the first zinc washer on a piece of tin foil then placing the cardboard socked vinegar on the washer finally placing the copper penny to complete one stack of the battery.
Photographs of Physics
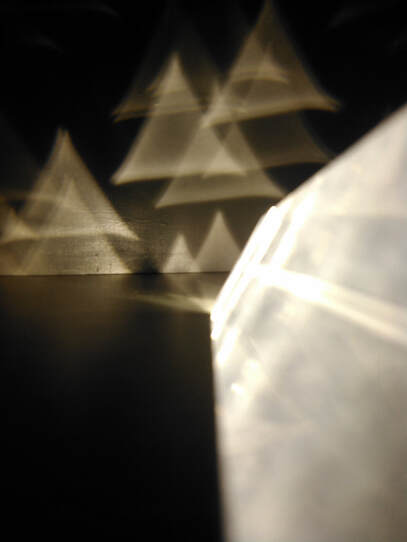
Project description: During this project we learned about the many different types of physics surrounding photographs. Some of these things including Reflection, waves, refraction, color, light waves, and light emission. My main focus was refraction demonstrated in the photo below.
Reflection:
I would say my greatest strength was working with photography, more specifically a form of art. I personally really enjoy art and photography has always been something I've been interested in. I feel like it showed in my photograph as a strength of mine. I took many different photos trying multiple different perspectives and finally decided on this one. I personally really enjoyed the fact you can see the prism used as my medium in the picture as well as what was produced.
I feel like my main struggle I had run into in this project was my camera quality. I found myself many times throughout this project struggling with the quality of the camera on my phone. When we had to take pictures for the initial research on refraction contrived or natural, my camera had struggles focusing on lots of the natural photos. My phone didn’t want to focus and when it did it tried to focus on the wrong part of the frame. With my contrived photo using a prism as a medium my phone had some issues focusing in the dark when the flash went off. In order to work around this I had continued to take different pictures and was waiting for my camera to focus on the right part of my frame. Overall I needed to have patience through the process. In future projects I will need to keep in mind that for a good final product I will need to take my time again no matter what the project is.
My number one takeaway from this project is probably understanding that things won’t always go according to plan. Something not much mentioned in my reflection is the original/main plan for this project. Doing work with our pinhole cameras that we made, most of us soon found out that the picture from our cameras wasn’t going to be an actual picture. Though the pinhole cameras were more of an experiment for us to work with and enjoy, most of them turned out to be brown, or have brown patches not showing an actual image. This isn’t shown much in my final product as our image from our camera wasn’t what we were being graded on and was more used as an experience to learn from. This was a good reminder that things won’t always go the way we want but we have to make the most of the situation.
As a scientist I had the opportunity to learn about many different types of phenomena seen in photography. This is interesting to me especially as I love photography and was able to learn about how it works and how older cameras worked.
I feel like I did good on my final photograph especially. I am personally really proud of how it came out though if I had the chance with an editing app I feel like I could have tried to make some refinements. As far as my writing and explanation goes I feel like I could have had some better explanations and examples. It definitely gets the point across but for someone who might now know anything about the physics phenomena refraction I feel like they might not gather as much information as possible. As an overall look at my project I feel like I did pretty good but definitely believe I could have added more to my explanation.
